
2016 March 6
This page provides advice on how to photograph Vandenberg AFB rocket and missile launches. The topics covered here are limited to the suggested photographic techniques. For information on launch visibility, viewing locations, and other topics, refer to Viewing Vandenberg AFB Launches.
Successful launch photography is possible with amateur equipment. In fact, several Vandenberg launch images published in newspapers and magazines were taken with inexpensive or vintage gear. It is not necessary to use the latest professional equipment, but it helps to use good equipment.
Any good digital or film camera (35mm or medium- or large-format) can produce high quality launch photos.
Digital cameras provide instant results that are already in digital form. One of their main drawbacks is internally generated noise, which limits the duration of time exposures. One task at which digital SLRs have a distinct advantage is making short exposures (a few seconds or less) at very high ISO settings (1600 and above).
In film-based photography, the film grain increases with speed, causing a corresponding decrease in resolution. However, with digital cameras, the image resolution is based on the number of pixels, which is the same regardless of the ISO setting. This opens the possibility that by using a fairly short exposure, you might be able to image twilight or night launch phenomena at higher resolution with a premium digital camera than with a film camera employing very fast film.
Film cameras, on the other hand, can often produce superior images, but the time needed to develop the film and scan the negatives means it could be hours or days before the images are available.
Digital and film cameras can both produce excellent daylight launch images. However, the webmaster's preference for night and twilight photography is vintage, fully manual 35mm cameras. They are easy to use, produce time exposures free of electronic noise, and do not use a battery to operate the shutter.
Two lens considerations of great importance in launch photography are focal length and sharpness.
The lens focal length, or magnification, to use depends on the time of day. In general, the optimum focal length to use for day launches is 135 to 400mm due to the small size of the launch vehicle and flame and relative thinness of the smoke trails or contrails. Overall, twilight and night launches exhibit phenomena of a larger scale than day launches and call for a focal length in the 28 to 135mm range.
An important point to keep in mind is the effect of a lens' focal length on image sharpness. As a general rule, as the focal length decreases, so does the sharpness as you move away from the center. In other words, if you focus a wide-angle lens based on what you see in the center, the sharpness decreases towards the edges. This is primarily an issue with lenses with a focal length of 35mm and less.
The aperture (f/ stop or iris) setting also affects a lens' sharpness. This is especially true with medium- and wide-angle lenses. Opening the iris too wide admits more light, but blurs the image (especially towards the edges) and exposes the image's center more than the edges. The rule of thumb is to use the widest aperture setting that does not noticeably sacrifice image sharpness. The widest usable aperture setting for various lenses is summarized below.
Widest Practical Aperture Settings
| Focal Length (mm) | Widest Aperture Setting |
|---|---|
| 28 | f/4 |
| 35 | f/3.4 |
| 50 | f/2.8 |
Bear in mind that the above table represents the widest you can open the iris on a lens and obtain a good photo. For the sharpest images, close the iris an additional 1/2 to 1 f/ stop. For example, rather than using an aperture setting of f/2.8 with a 50mm lens, use f/3.4 or f/4.
Yet another factor that affects sharpness is the lens design. In the author's opinion, fixed focal length premium lenses usually provide better images than zoom lenses.
Few factors affect the appearance of film-based launch photography more than the choice of film. With the exception of special situations, color film is preferred because color photos are more visually appealing and unlike black and white film, most labs can process color film without having to send it out.
Slide film tends to have more contrast and therefore less exposure latitude. Print film, on the other hand, has less contrast but is more forgiving with regard to exposure. The majority of smaller labs need to send slide film out for special processing, but can develop print film in-house. When it comes to scanning film images and converting them to digital form, slide film is probably superior to print film because it is easier for the scanner operator to determine the correct settings. Scanning color negatives is more subjective. Professional photographers tend to prefer slide film; the author uses print film out of habit.
Selecting the right film requires an understanding of how film speed (ISO) affects film behavior. In general, as film speed increases the following occurs:
In general, films for launch photography should meet the following criteria:
The choice of film depends on the time of day and which aspect of a launch you want to record. A good rule of thumb is to use the slowest speed film that the lighting conditions will allow. The following table lists several films that the webmaster considers the best in their respective speed classes:
Recommended Films
| ISO (Speed) |
Name | Film Type |
Comments |
|---|---|---|---|
| 100 | Kodak Gold 100 | Very sharp images. Excellent choice for day launches under direct sun. Works well for long time exposures at night | |
| 100 | Kodak E100G | Slide | Extremely fine grain |
| 200 | Kodak Elite Chrome 200 | Slide | Good red response. Kodak Professional Ektachrome E200 uses the same emulsion as Kodak Elite Chrome 200. |
| 400 | Fuji Superia 400 | Good all-around film. Good choice for photographing sunlit exhaust plumes against a twilight or night sky | |
| 400 | Fuji Provia 400F | Slide | None |
| 400 | Fuji Sensia II 400 | Slide | None |
| 800 | Fuji Superia 800 | Slightly grainy, but a good all-around film. Good choice for photographing sunlit exhaust plumes against a twilight or night sky. Best film for photographing dim phenomena associated with night launches |
One of the most important pieces of launch photography equipment is a tripod. A tripod increases image sharpness by reducing camera motion and is essential for photographing both day and night launches. If you do not have a sturdy tripod, you will need to buy or borrow one.
A good rule of thumb for selecting a tripod is, the heavier and more massive, the better. If possible, try to use one with a three-axis head because it allows you to orient the camera with respect to the horizon in addition to aiming it in azimuth and elevation.
When shopping for a tripod, expect to pay at least $130 for a new one. Avoid the inexpensive, flimsy tripods sold at many camera stores. They are a waste of money and can ruin what otherwise would have been a great photo.
Another important piece of equipment is a cable release or remote control to operate your camera's shutter without shaking the camera. If your camera accepts a cable release, use one that allows you to lock the plunger in the depressed position.
Filters improve launch images by increasing contrast and color saturation, reducing haze, and darkening the sky. The two essential filters are:
The usefulness of the above filters for daylight photography is well known. They may also be useful during time exposures at night if the Moon is present, but the author has not verified this.
An important but overlooked piece of equipment is a digital clock or watch that displays seconds. Units that automatically synchronize themselves via radio with the atomic clock are especially useful and are relatively inexpensive.
Some GPS units also display the time. The indicated time may be incorrect when you first turn the unit. It needs to lock-on to multiple satellites and reset its clock before it will display the correct time.
A magnetic compass is used to aim the camera for daylight or night launch photos. The best models have an adjustment for magnetic declination and are liquid filled to damp needle vibrations. Sporting goods and backpacking equipment dealers usually carry several compass models. The author's favorite is the Silva Ranger.
A clinometer is a tool designed to measure inclines. It allows you to set the camera elevation for night time exposures. Clinometers are inexpensive and sold at hardware stores and fix-it centers.
Few things spoil an otherwise good photo more than a tilted horizon. Properly composed photos should have one edge of the field of view parallel with the horizon and the other perpendicular to it. A bubble level allows you to accurately level your tripod and align your camera with respect to the horizon.
There are three factors to keep in mind when photographing daytime launches: location, magnification, and contrast. Try to get as close to the launch site or vehicle's flight path as possible to increase the image scale and to minimize the amount of contrast-sapping atmosphere between you and your photo subject. The best locations are within 60 miles of the launch site and above the Marine Layer. Two good photo locations are Santa Ynez Peak and East Camino Cielo.
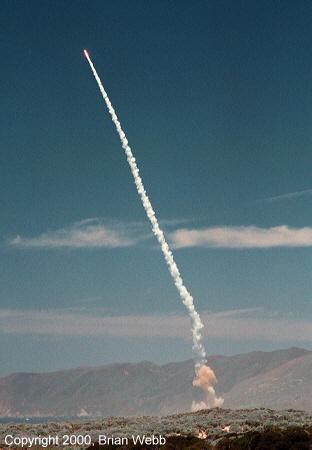
Telephoto of the 2000 maiden flight of the OSPTLV (Orbital Suborbital Program Target Launch Vehicle) missile. The image shows the OSPTLV climbing after its leaving silo at northwest Vandenberg.
If you are within 10 miles of the launch site or vehicle's flight path, you can get by with a 50mm (standard) lens. If you are further away, the vehicle will be quite small and the smoke trail or contrail too thin to see any detail. The remedy is to use a telephoto lens. Lenses with a focal length below 135mm do not magnify enough while those higher than 400mm magnify so much that the missile is hard to track.
Daytime launch images can be improved by using filters to improve contrast. For the best results, always use a good UV-haze filter. If sky is clear and the missile will be at a right angle with respect to the sun, you can further improve image contrast and color saturation with a polarizing filter.
To determine the correct exposure, do some research before launch and use your camera's light meter to take shutter speed and f/stop readings of various features in the distance (sky, distant terrain, etc.). Then choose a shutter speed and f/stop that is an average of your readings. If you are using a polarizing filter, open the iris 1/2 stop (one click) wider than that indicated by the light meter.
Night and twilight launches provide a variety of interesting phenomena to photograph. They include:
When viewed from long distances, the initial portion of many night launches resemble fireballs. This fireball effect is relatively easy to record and can make for a good photo if interesting foreground detail (such as distant streetlights) is present.
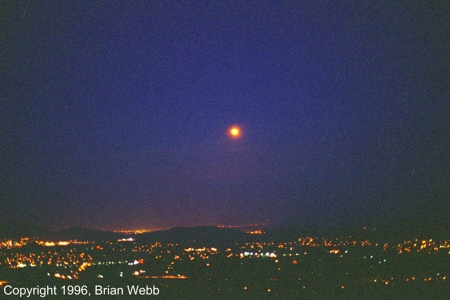
Photo of the fireball effect recorded during the 1996 dawn launch of a Delta II rocket carrying the MSX satellite. The webmaster took this image from a distance of about 100 miles with a 50mm lens.
To photograph the fireball effect, use the following suggested exposures:
Fireball Effect Exposure Data
| ISO (Speed) |
Exposure (seconds at f/2.8) | Comments |
|---|---|---|
| 800 | 1, 1/2, 1/4 | None |
| 1600 | 1, 1/2, 1/4, 1/8 | None |
| 3200 | 1, 1/2, 1/4, 1/8, 1/15 | Premium digital cameras may provide superior image quality compared to film at this ISO setting |
The first stages of some vehicles produce large, bright flames. You can capture these on film using short exposure times if your location is within 150 miles of the flight path of the vehicle.
This snapshot of a Titan IV night launch records fleeting detail in the flames from the vehicle's solid rocket motors. The flame was long enough to allow photography without a telephoto lens.
The following table lists the recommended exposures for recording flame detail.
| ISO (Speed) |
Exposure (seconds at f/2.8) | Comments |
|---|---|---|
| 400 | 1/8, 1/15, 1/30, 1/60, 1/125 | None |
| 800 | 1/15, 1/30, 1/60, 1/125, 1/250 | None |
| 1600 | 1/30, 1/60, 1/125, 1/250, 1/500 | None |
| 3200 | 1/60, 1/125, 1/250, 1/500, 1/1000 | Premium digital cameras may provide superior image quality compared to film at this ISO setting |
Twilight launches often exhibit thick exhaust trails or large exhaust plumes that can be photographed over a wide area. To image twilight launches, the location is not critical, but photo sites where launch occurs at sunset +30 minutes or sunrise -30 minutes are optimal.
A telephoto snapshot showing the sunlit first stage main engine exhaust plume from a Delta II morning twilight launch from Vandenberg AFB. The webmaster wanted to record the plume as it looked to the naked eye. This required the use of a high-speed (light sensitive) film to allow for an exposure short enough to prevent image smear from the rocket's motion.
If the plume is bright enough, take light meter readings1 and use the indicated exposure and one exposure slower. Otherwise, use the suggested exposures in the following table:
| ISO (Speed) |
Exposure (seconds at f/2.8) | Comments |
|---|---|---|
| 400 | 1/60, 1/15, 1/4, 1, 2, 4, 6, 8 | None |
| 800 | 1/125, 1/30, 1/8, 1/2, 1, 2, 4, 6 | None |
| 1600 | 1/250, 1/60, 1/15, 1/4, 1, 2, 4, 6 | None |
| 3200 | 1/500, 1/125, 1/30, 1/8, 1/2, 1, 2, 4 | Premium digital cameras may provide superior image quality compared to film at this ISO setting |
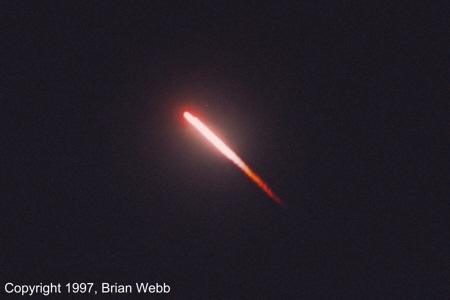
An interesting phenomenon that is often visible during night and twilight launches is the flashing from still-burning, spent solid rocket motors following jettison. The best photo locations to record this effect are within 120 miles of the launch site or vehicle flight path.
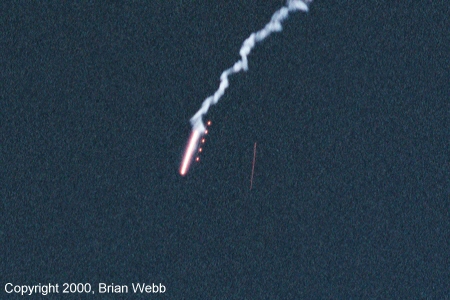
Close up of an image showing the trail made by the spent first stage (orange dots) from an MSLS missile. The first stage had been jettisoned and was still burning as it tumbled end-over-end. A burning piece of missile debris made the orange line to the right.
To record flashing, spent rocket motors, use ISO 400, 800, or 1600 film or set your digital camera similarly. Follow the vehicle through the camera's viewfinder or pre-aim it at the point in the sky where staging will occur. Open the open the shutter a few seconds before or at the instant of staging. Hold it open until the flashing spent motor disappears from view (typically about 8 seconds).
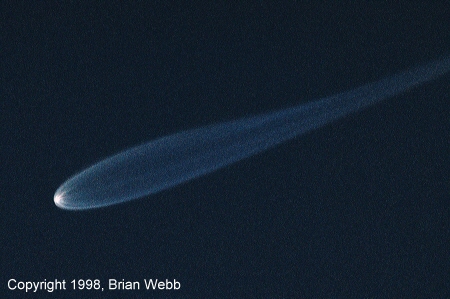
Night and twilight launches often produce interesting aftermath. Depending on the position of the Sun, these left-over trails and clouds can range in brightness from relatively bright to very faint. If the lighting is right, the aftermath can have a delicate, iridescent quality.
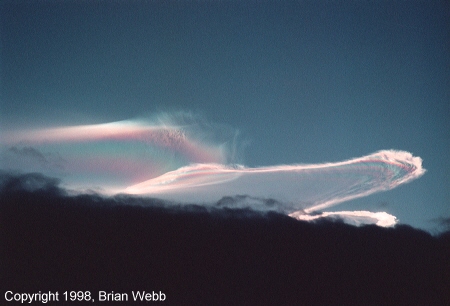
This image shows the aftermath of the Pegasus XL/TRACE launch. Note the rainbow-like iridescence.
When photographing aftermath, try to obtain a light meter reading1 of the brightest part of the exhaust and shoot at the indicated exposure and three successively longer exposures. If a light meter reading is not possible, use the suggested exposures in the following table:
Launch Aftermath Exposure Data2
| ISO (Speed) |
Exposure (seconds at f/2.8) | Comments |
|---|---|---|
| 100 | 1/15, 1/4, 1, 4, 16, 64, 256 | None |
| 200 | 1/30, 1/8, 1/2, 2, 8, 32, 128 | None |
| 400 | 1/60, 1/15, 1/4, 1, 4, 16, 64 | None |
| 800 | 1/125, 1/30, 1/8, 1/2, 2, 8, 32 | None |
| 1600 | 1/250, 1/60, 1/15, 1/4, 1, 4, 16 | None |
| 3200 | 1/500, 1/125, 1/30, 1/8, 1/2, 2, 8 | Premium digital cameras may provide superior image quality compared to film at this ISO setting |
When photographing the fireball effect, flame detail, or exhaust plumes, use a 50 to 150mm lens.
Holding the shutter open during night and deep twilight launches allows you to record the vehicle's flight path. Locations within 120 miles of the launch site or vehicle flight path are preferred. The goal is to adequately exposure the vehicle's trail while minimizing the brightness of the sky due to light pollution, moonlight, and twilight.
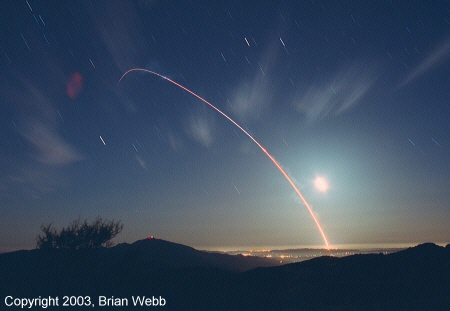
Time exposure of a Peacekeeper ICBM launch. This image recorded the entire visible portion of the launch from lift-off through third stage burnout.
Remember that the longer the time exposure, the darker the photo site needs to be. To record the flight path of a rocket or missile, do the following:
| ISO | Distance (statute miles) | |||||||
|---|---|---|---|---|---|---|---|---|
| 3.125 | 6.25 | 12.5 | 25 | 50 | 100 | 200 | 400 | |
| 100 | f/22 | f/16 | f/11 | f/8 | f/5.6 | f/4 | f/2.8 | --- |
| 200 | --- | f/22 | f/16 | f/11 | f/8 | f/5.6 | f/4 | f/2.8 |
| 400 | --- | --- | f/22 | f/16 | f/11 | f/8 | f/5.6 | f/4 |
| 800 | --- | --- | --- | f/22 | f/16 | f/11 | f/8 | f/5.6 |
| 1600 | -- | --- | --- | --- | f/22 | f/16 | f/11 | f/8 |
Minuteman III Time Exposure Data6
| ISO | Distance (statute miles) | |||||||
|---|---|---|---|---|---|---|---|---|
| 3.125 | 6.25 | 12.5 | 25 | 50 | 100 | 200 | 400 | |
| 100 | f/11 | f/8 | f/5.6 | f/4 | f/2.8 | --- | --- | --- |
| 200 | f/16 | f/11 | f/8 | f/5.6 | f/4 | f/2.8 | --- | --- |
| 400 | f/22 | f/16 | f/11 | f/8 | f/5.6 | f/4 | f/2.8 | --- |
| 800 | --- | f/22 | f/16 | f/11 | f/8 | f/5.6 | f/4 | f/2.8 |
| 1600 | -- | --- | f/22 | f/16 | f/11 | f/8 | f/5.6 | f/4 |
Peacekeeper Time Exposure Data7
| ISO | Distance (statute miles) | |||||||
|---|---|---|---|---|---|---|---|---|
| 3.125 | 6.25 | 12.5 | 25 | 50 | 100 | 200 | 400 | |
| 100 | f/13.5 | f/9.5 | f/6.8 | f/4.8 | f/3.4 | --- | --- | --- |
| 200 | f/19 | f/13.5 | f/9.5 | f/6.8 | f/4.8 | f/3.4 | --- | --- |
| 400 | --- | f/19 | f/13.5 | f/9.5 | f/6.8 | f/4.8 | f/3.4 | --- |
| 800 | --- | --- | f/19 | f/13.5 | f/9.5 | f/6.8 | f/4.8 | f/3.4 |
| 1600 | --- | --- | --- | f/19 | f/13.5 | f/9.5 | f/6.8 | f/4.8 |
Pegasus XL Time Exposure Data8
| ISO | Distance (statute miles) | |||
|---|---|---|---|---|
| 50 | 100 | 200 | 400 | |
| 100 | --- | --- | --- | --- |
| 200 | f/5.6 | f/4 | f/2.8 | --- |
| 400 | f/8 | f/5.6 | f/4 | f/2.8 |
| 800 | f/11 | f/8 | f/5.6 | f/4 |
| 1600 | f/16 | f/11 | f/8 | f/5.6 |
Note that when photographing launches from distances of 6.25 miles or less, the recommended aperture settings will probably yield a correctly exposed trace from the vehicle, but little foreground detail. You can record more foreground detail by either opening the aperture setting one or two f/ stops (for example, rather than using f/11, use f/8 or f/5.6) or using the recommended aperture setting, but opening the shutter several minutes in before launch.
One-hour labs offer a fast turn around and are inexpensive, but the results tend to be inferior. In addition, there is a real risk of film damage such as scratches and uneven development.
Professional labs, on the other hand, are more expensive, but offer a wider range of services (enlargements, negative scans) and generally provide better results. Having your film processed at a professional lab lowers the risk of film damage, but does not eliminate it. To find a professional lab, ask professional photographers in your area where they have their critical work processed.
When you have print film developed, do not judge your results on based on first set of prints. The printing machine often uses the wrong settings when it prints an image. In addition, a skilled lab technician can sometimes compensate for your mistakes (overexposure, etc.) and produce a good print.
1To photograph exhaust plumes and aftermath, it is advisable to take light meter readings of the sky but a day or two in advance at the same time as the launch. The resulting data will give you an idea of the longest exposure to use.
Sky brightness can change noticeably in a matter of minutes. During the spring and fall, the times sunrise and sunset can change by more than a minute per day. For the most accurate exposure data, determine the exact launch time, determine the times of sunrise and sunset for launch day and a day or two in advance, and adjust the time of your readings accordingly.
The following are examples of sky background data:
 Scenario: Attempt to gather sky background brightness data for the dimmest area
 of the sky near the autumn equinox.
 Sunset Date (UTC): 1999 SEP 27
 Sunset Time (UTC): 01:45:27
 Sunset Azimuth (deg.): 268.41
 Light Meter Setting (ASA): 400
 Camera Azimuth (deg.): 358.41 (90 deg. right of sunset azimuth)
 Camera Elevation (deg.): 45
 Sky Condition: Zero cloud cover with moderate haze
 Comments: Sky background was bluest (darkest) where the camera was aimed

 Sunset            Exposure
 (mm:ss)    f/      (sec)
 +02:38     2.8     1/250
 +07:17     2.8     1/125
 +10:37     2.8     1/60
 +13:34     2.8     1/30
 +16:05     2.8     1/15
 +18:30     2.8     1/8
 +21:05     2.8     1/4
 +24:18     2.8     1/2
 +30:55     2.8     1

 Scenario: Attempt to gather sky background brightness data for the dimmest area
 of the sky near the winter solstice.
 Sunset Date (UTC): 2000 JAN 04
 Sunset Time (UTC): 00:56:20
 Sunset Azimuth (deg.): 242.4
 Light Meter Setting (ASA): 400
 Camera Azimuth (deg.): 332.5 (90 deg. right of sunset azimuth)
 Camera Elevation (deg.): 45
 Sky Condition: Zero cloud cover with slight haze
 Comments: Sky background was bluest (darkest) where the camera was aimed

 Sunset            Exposure
 (mm:ss)    f/      (sec)
 +02:52     2.8     1/250
 +08:10     2.8     1/125
 +11:45     2.8     1/60
 +14:50     2.8     1/30
 +17:35     2.8     1/15
 +20:10     2.8     1/8
 +22:50     2.8     1/4
 +26:12     2.8     1/2
 +32:30     2.8     1
2The exposure data for bright exhaust plumes and launch aftermath recommends using every other shutter speed. The author's experience shows that for medium contrast films, such large exposure increments are reasonable because there is only a slight change in image density if each consecutive shutter speed is used.
3The suggested exposures for faint exhaust plumes increase in relatively small increments in order to obtain an exposure that is long enough to record a usable image, but short enough to minimize blurring of the plume by the vehicle's motion.
4The time exposure data was obtained by finding a time exposure of the vehicle type in question from the webmaster's photo library; researching film, f/ stop, and exposure used; calculating the distance from the camera to the launch site or vehicle flight path; and determining what the ideal exposure should have been for a moderately bright trail.
The exposure data for other distances was extrapolated by using the ideal exposure data with a general rule that as the distance from the camera to the launch site of vehicle flight path is doubled, the required exposure doubles.
5Delta II 7209 time exposure information was derived from examination of frames 1998-05-11A and 1998-16-28A. This table provides recommended exposures for recording the trace made by the nine solid rocket motors. After burnout and jettison of the solid rocket motors, the first stage main engine continues to burn, but the first stage's brightness is greatly reduced.
6Minuteman III data was computed to yield a moderately heavy missile trail from the first and second stages during a 3m 30s exposure.
7Peacekeeper time exposure data based on frame 2003-02-12. The data was computed to yield a moderately heavy missile trail from the first and second stages during a 3m 30s exposure.
8Pegasus XL time exposure data is for the first and second stage burns. Frame 1999-05-23 was used as an exposure benchmark. It indicated that for side profile shot of the second stage burn from a range of 261.5 statute miles, the ideal exposure at ISO 100 is f/1.8. The other Pegasus XL exposure data was extrapolated from this ideal exposure.
Copyright © 2001-2016, Brian Webb. All rights reserved.